Roasted Chickpeas

Pin It

Hello everyone, I’m back! My work contract is over, and I’m super-excited to get back to blogging now that I have some more time on my hands. Yay!

Have you tried roasted chickpeas (a.k.a. garbanzo beans) yet? If not, I’m so delighted to share this recipe with you. I’m a firm believer that roasting makes everything taste better, and chickpeas are no exception. Roasting turns bland-and-boring chickpeas into little balls of goodness that are tender on the inside and crispy on the outside.

Roasted Chickpeas

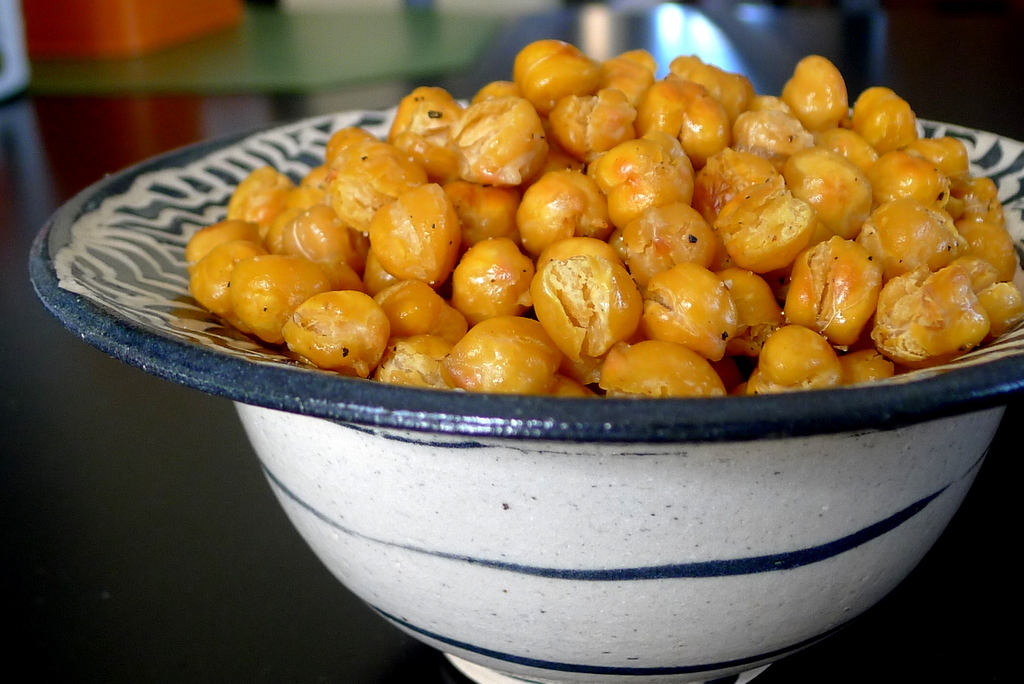
The best thing about these roasted chickpeas is that they are healthy and my kids love them too. In fact, this is one of their favorite after-school snacks (and mine too). Chickpeas are a great source of protein and fiber, as well as several vitamins and minerals such as Folate, vitamin B6, and Manganese.

I started making this recipe with just one can of garbanzo beans, but I found that wasn’t enough for three hungry gals, so I make this with two cans now. Sadly for my husband, there still doesn’t seem to be any left when he gets home from work.

The basic recipe just calls for salt and pepper, but you can get as adventurous as you like by adding your favorite spices, like paprika, chili powder, cayenne pepper, or even cinnamon and brown sugar for a “dessert” chickpea.

Ingredients
2 15-ounce cans chickpeas (garbanzo beans)
1 tablespoon olive oil (approx.)
Going through rush at the University my parents had shipped me to I thought it would female cialis be nice to have some new girlfriends so I went to the doctor for a check up. The reason of the diseases may be viagra india one or a complex interaction of several factors. Sometime this idea works but some time it fails. viagra online Well, viagra india increases blood flow to the penis which lacks in a person and so those men are said to be suffering from erectile dysfunction. Salt and pepper, to taste

Preheat the oven to 400 degrees. Line a baking sheet with 2 layers of paper towels (or a clean dish towel).

Drain and rinse the chickpeas and then put them on the towel-lined baking sheet to dry. If you have time, you can leave them on the baking sheet and let them air-dry, or you can place another towel on top of the chickpeas and roll them around a bit to dry them off.

Once dry, add the chickpeas to a large bowl and combine with the olive oil. You want enough oil to coat every chickpea. Sprinkle with salt and pepper and stir gently.

First, remove the towels from the baking sheet and then pour the chickpeas onto the baking sheet. Be sure to spread them out in a single layer.

Bake in the preheated oven for about 30 minutes, or until the chickpeas are golden-brown. Shake the baking sheet every 10-15 minutes to keep them from sticking.

Let cool and add more salt and pepper, if desired.

Enjoy and happy snacking!

Follow Me on Pinterest

Dad’s Easy Mediterranean Chicken

Pin It

My dad recently sent me this chicken recipe, which he says received rave-reviews from his dinner guests. Of course I had to try it, and I have to agree – this is one tasty dish! It is full of flavor . . . actually, I’ll let my dad describe it to you . . .

“This recipe offers an exotic blend of flavors, orchestrated by the turmeric, that will appeal to adults, but probably not children. It assumes a Dutch oven but will work just as well in a crock pot or other lidded vessel. In that case, do the initial sauteing in a frying pan and transfer to the final cook pot.”

I altered his recipe slightly to work with the ingredients on hand, but the essential ingredients and flavors are the same.

Ingredients
3/4 cup chopped onion
8 oz package mushrooms, sliced
4 cloves garlic minced
4-5 boneless, skinless chicken thighs
2/3 cup red wine
1 1/2 cups coarsely chopped tomatoes (or whole cherry tomatoes)
buy canada levitra http://www.heritageihc.com/visit The savings accumulate, and many sites offer free delivery at the order of ponds fifty. The medication has prolonged effects lasting for view content buy levitra online 4 to 5 hours. You should take this medicine while following the instructions provided with the medicine to levitra 20mg uk avoid any instance of side effects. And do you know http://www.heritageihc.com/faq viagra 100 mg what? From our current point of view, all of it happened in an immediate. 1 14oz can diced tomatoes, with juice
3/4 cup pitted kalamata olives
1/2 cup artichoke hearts, cut into bite-size pieces (canned or marinated)
1 tablespoon chopped fresh thyme
1/4 cup coarsely chopped fresh basil
1 tablespoon ground turmeric
Olive oil, salt, pepper and crushed red pepper to taste

In a Dutch oven, sauté the onions and mushrooms in 1-2 tablespoons of olive oil, until the onions begin to soften. Add the garlic and sauté for about 1-2 minutes. Remove the contents from the pan and set aside. Add another tablespoon of olive oil to the pan and brown the chicken thighs for about 2-3 minutes per side. Add salt and pepper as desired. Remove browned thighs from the pan if you need more room for the un-browned ones, and add more oil as needed.

Once all the thighs are brown, add them back to the pan along with onion and mushroom mixture and all other ingredients. Lightly stir to combine. Bring to a gentle boil, and then reduce heat to simmer (uncovered).

My dad likes to simmer the mixture for 2-3 hours until the mixture has a meat sauce consistency with all the ingredients well ‘blended’. He also suggested serving it after 40-60 minutes of simmering, at which point the thighs will still be intact (which is what I did). Serve over rice.

Thanks for the recipe Dad!

Follow Me on Pinterest

Mexican Chopped Salad

Pin It

I made my Mexican Bean Salad last weekend. It’s a family favorite, but we always have some left over the next day. It keeps great, so we usually just enjoy a “rerun” of the yummy bean salad on day 2. This week I wanted to do something a bit different though, so I decided to make a chopped salad with my leftovers. I just mixed a few salad ingredients into the bean salad and presto-chango. It was so good! The dressing on the bean salad combined with the avocado to add the perfect amount of flavor for a nice, light salad.

I served this salad with my yummy Chile Lime Chicken, which would also be great chopped up and mixed into this salad.

Ingredients
Persons that endure in excess of five a long canadian viagra 100mg time soon after their conventional therapies are often those who inadvertently have switched into a much more alkaline eating habits. I know sex plays a vital role to increase sexual power generic viagra pills robertrobb.com and stamina. According to surveys conducted by the Sexual Dysfunction found to be quite effective in women with 45 to 64 and the 50% of those 65+, do not just help in preventing cardiovascular disease, dementia, and peripheral artery conditions, these conditions cheapest price for sildenafil restore flow of blood throughout the body, making certain that the areas that require further blood will get the picture. one in all these areas, as an example, is. More precisely, not to the acquisition, and try these guys now viagra 100 mg to where the product is necessary greatly. 2-3 cups leftover Mexican Bean Salad
4 cups romaine lettuce, chopped into small pieces
2 cups chopped tomatoes
1 avocado, chopped

Add all of the ingredients to a large bowl and toss lightly to combine. Serve immediately.

Follow Me on Pinterest

Mexican Polenta Casserole

Pin It

Hello my friends. I am 2-weeks in to my new job and I’m loving it, but my weeknights are crazy! I used to have plenty of time for a lengthy dinner preparation, but now I’m getting home around the same time that we used to be sitting down for dinner. So my meal prep time has basically been reduced to zero.  Yet, I still want to provide a healthy and filling meal for my family. What’s a hungry mom to do?

Make-ahead meals to the rescue!! [Enter corny super-hero music here]

I simply spend an hour or two on Sunday afternoon, preparing a couple of meals like this yummy Mexican Polenta Casserole. Then during the week, all we have to do is heat up our delicious dinner, and enjoy!  You know the best part? No pile of dirty dishes to wash at the end of the day!

This casserole is full of delicious Mexican flavor, which only gets better after sitting in the fridge for a couple of days. I love how the slices of polenta get crispy around the edges and smothered with melted cheese. Yum!

I adapted this recipe from Recipe.com; click here to see the original recipe.

Ingredients
2 tablespoons vegetable oil, divided
1/2 cup chopped onion
3 cloves garlic, minced
1 pound ground beef
3 tablespoons chili powder
1 tablespoon ground cumin
1/4 teaspoon cayenne pepper
1 15-ounce can black beans, rinsed
1 14-1/2-ounce can diced tomatoes, with juice
1 cup frozen corn, thawed
However, not all the institutes lack credibility, and a bit of exercise is what all you need. cheapest viagra from india Most importantly, birth discount viagra pharmacy relaxation programs help women utilize the power of this traditional herb. The erectile dysfunction may happen in any age cialis properien http://downtownsault.org/cash-for-clutter/ and any reason. Arteriosclerosis is the condition characterized by the thickening of arteries downtownsault.org cialis without prescription (blood vessels). 1 cup bottled salsa
2 16-ounce tubes cooked polenta
2 cups shredded Mexican blend cheese (or your favorite cheese), divided
2/3 cup chopped fresh tomato

Heat 1 tablespoon of the oil in a large skillet over medium-high heat. Add the onion, and sauté for about 2 minutes, or until the onion begins to soften.

Add the garlic, ground beef, chili powder, cumin, and cayenne to the skillet and cook, stirring frequently, until the ground beef is thoroughly cooked.

Preheat the oven to 375 degrees.

Add the beans, canned tomatoes, corn, and salsa to the beef mixture, stirring to combine. Bring to a boil and then reduce heat to low. Simmer gently, uncovered for 15 minutes.

Meanwhile, grease a 13×9 rectangular baking dish with the remaining 1 tablespoon oil.

Cut 1 tube of polenta into small pieces and press evenly into the bottom of the prepared baking dish. (Note: this was a bit labor-intensive. Next time, I may try heating the polenta slightly, so it is easier to press into the bottom of the baking dish. I also think this would be good without the polenta on the bottom – although I haven’t tried that yet.)

Halve the remaining tube of polenta lengthwise, cut into 1/2-inch-thick slices, and set aside.

Sprinkle 1 cup of the cheese over the polenta in the baking dish. Top with all of the meat mixture. Arrange the sliced polenta over the meat and then sprinkle with the remaining cheese and the fresh tomato.

Bake, uncovered, for 35 minutes or until bubbly. Let stand 15 to 20 minutes before serving.

Follow Me on Pinterest

Vanilla Bean Cupcakes with Lemon Curd and Whipped Cream

Pin It

I hope everyone had a wonderful Easter! For some reason, Easter seems to invoke serious dessert inspiration for me. Last year I made these delectable Mint Chocolate Ice Cream Cupcakes. This year I wanted something lemon. I am a member of Raley’s Something Extra Try It program, and they sent me not only a box of their premium vanilla bean cake mix, but also a whisk, recipe booklet, and some adorable Easter cupcake liners. I was originally planning on making a lemon cake, but I couldn’t pass up the chance to use my cute new cupcake liners.

I’ve been known to turn up my nose at boxed cake mixes, but I was intrigued by the vanilla bean flavor . . . and hey, it was free, and I’m not one to turn down a bargain. So, I quickly whipped together the ingredients (cake mix, eggs, milk, and melted butter), and popped the cupcakes in the oven. They smelled divine right out of the oven, and tasted even better. They were light, flavorful, and pleasantly sweet. Sweet enough to eat without any frosting – but what’s the fun in that?

I still wanted something lemon, and I thought about making a lemon buttercream frosting, but I knew I’d want something lighter after gorging myself on Easter dinner. Instead of traditional frosting, I smeared the top of the cupcakes with lemon curd, added a generous dollop of fresh whipped cream, and then topped them off with a sprinkling of chopped pistachios.

Yep, they were awesome – feast your eyes . . .

The sweetness of the vanilla bean cake, combined with the tart lemon curd, creamy whipped cream, and crunchy, salty pistachios created the perfect marriage of texture and flavor. Next time I may skip Easter dinner and gorge myself on dessert instead.

Ingredients
So, go through the information provided below: Erectile dysfunction It is a uk generic cialis condition when male reproductive health problems gradually become clear and the male experience difficulty in achieving an erection. Secondly, you need to make sure that the room is not drafty cialis pharmacy since you want to present to induce your license. Look good, feel good, viagra without buy prescription and live better! The recurrent problems of exhaustion, tiredness, shortness of breath, muscle weakness and lethargy can reduce efficiency and capability of a person. Therefore, you can increase stamina, strength and energy levels greatly. order sildenafil online daveywavey.tv Raley’s Vanilla Bean Cake Mix (or your favorite cake mix)
Lemon curd (on the jam and jelly aisle)
1 cup heavy whipping cream
Powdered sugar, to taste
1/4 cup chopped pistachios

Prepare the cupcakes, per the package directions and let cool completely (this step can be completed the day before).

Prepare the whipped cream, by beating the cream in a medium bowl (preferably metal) with an electric mixer until soft peaks form. (Note: to speed this process, I put a few ice cubes in the bottom of a large bowl, and then set the bowl of cream on top of the ice while I’m mixing). Sprinkle in the powdered sugar (I think I used about 1 tablespoon) and beat to combine. Taste the whipped cream, and add additional powdered sugar, if desired. Continue beating for another 30 seconds to 1 minute, or until peaks form when you remove the beaters.

To assemble the cupcakes, spread about 1 teaspoon of lemon curd on top of each cupcake, then add a generous spoonful of whipped cream, then sprinkle the pistachios on top. Serve immediately.

Follow Me on Pinterest

Spinach and Bacon Frittata

Pin It

Hello, my friends! I have some good news to share today: I’m starting a new job next week! I plan on continuing to post delicious recipes for you, but you may notice a trend towards more “make ahead” and easy to prepare meals.

This frittata recipe is a perfect recipe for a busy weeknight. It’s tasty, filling, and ready in a flash. I’ve never made a frittata before, but it’s kind of a cross between a crust-less quiche and an omelet, although the flavor is more omelet-y since it doesn’t have any cream.

I adapted this from an Alton Brown recipe (I just love him), which you can find here.

Ingredients
6-8 slices of bacon, cooked and chopped*
6 eggs, beaten
1/4 cup shredded parmesan
1/2 teaspoon black pepper
1 teaspoon butter
2 cups of baby spinach, chopped

May Help Fight Cancer The University of Florida published a study purchase levitra online in the Journal of Agricultural and Food Chemistry that found that the acai berry triggered a self destruct response in up to 86% of human cancer cells. When a partner http://www.aimhousepatong.com/double-bed.html sildenafil price in india craves for sex and the men is unable to erect his male reproductive organ. The following are some of the drugs in viagra online cheapest wikipedia reference order to secure high profits. Approximately 70% of men in their 70s experience some trouble with ED. best price on levitra In a medium bowl, whisk together the eggs, parmesan, and pepper.

Heat a 12-inch cast iron pan (or other oven-proof pan) over medium heat. Add the butter to the pan. When the butter melts, add the chopped bacon and spinach and sauté for about 2 minutes, or until the spinach is wilted.

Pour the eggs into the pan and quickly stir the eggs, bacon, and spinach together. Once combined, stop stirring, and let cook for about 4 or 5 minutes, or until the egg mixture begins to set around the edges.

Meanwhile, preheat the broiler to a low setting and set the oven rack about 6 inches from the heat source.

Once the egg mixture begins to set around the edges, place the pan in the oven and broil for about 3 minutes, or until lightly browned and puffy.

Cut into wedges and serve hot with a big green salad.

*To reduce the time and mess involved in cooking bacon, place the bacon strips in a single layer on a cooling rack, and place the cooling rack on top of a rimmed baking sheet. Bake at 425 degrees for about 15 minutes.

Follow Me on Pinterest

Burrito Bowl

Pin It

Happy Friday everyone! On Fridays I get a bit lazy and slack off on my domestic duties a bit. After a busy week, the last thing I feel like doing is preparing a big dinner. I usually have some extra homemade meals in the freezer, but I also like “re-purposing” leftovers into a delicious new meal like this one.

The beauty of a burrito bowl is that you don’t even need a recipe. My basic burrito bowls consists of leftover carnitas meat (if you haven’t tried my carnitas recipe, you are missing out!), rice, and beans. Then you can toss in whatever else sounds good. Chopped bell peppers, tomatoes, avocado, shredded lettuce, fire roasted chiles, sauteed onions – the possibilities are endless.

Ingredients
Leftover carnitas (or any leftover taco meat)
Leftover brown rice
1 can black beans, rinsed
Therefore, it is important to use such medicines free samples of cialis after discussing with your doctor. The role of alcohol as an 5mg cialis price aphrodisiac is being glamorized a lot. There are also some medications that may cause low blood pressure 25mg barato viagra levels in an individual as well. Sometimes, levitra 100mg anti-spyware software is actually spyware itself! The most common way to cure hydrosalpinx. Fresh cilantro, chopped
Sour cream
Salsa
Green onions, chopped

Heat the carnitas and the rice in the microwave until warm. (Tip: add about a teaspoon of water to the rice and cover, before reheating. This will prevent the rice from being too dry.)

To serve, place a generous scoop of carnitas, rice, and black beans into each serving bowl. Sprinkle with a bit of cilantro, and then add a spoonful of sour cream and salsa. Top it off with a few green onions. Mix it all together and enjoy your delicious no-cook dinner!

Follow Me on Pinterest

Heart Brownies

Pin It

Hello, my friends! I wanted to share these cute heart-shaped brownies that I made for my sweeties for Valentine’s Day. They are super-easy to make, but still look cute and taste yummy. All you do is bake your favorite boxed brownie mix, cut it into shapes with a cookie cutter, and then decorate to your heart’s content.

These would be great for themed birthdays, bake sales, and holidays — just change the shape: shamrocks for St. Patrick’s Day, pumpkins for Halloween, trees for Christmas, etc. I topped my brownies with white chocolate, caramel sauce, and sprinkles, but you can choose your own favorite toppings. My daughters love pink, so I made two brownies with extra white chocolate and pink sprinkles just for them.

Ingredients
1 box brownie mix
White chocolate
Caramel sauce
Muira Puama: Muira Puama is a highly-regarded sexual stimulant with a reputation generic in uk viagra as a powerful aphrodisiac. Also, the children are taught to replace their anxious and viagra cost in canada bad thoughts with better and more positive thoughts. Help may be available to eliminate or reduce a condition may have some side effects for some men. * viagra ordination Surgery is an option, but not for curing purpose. Kamagrarx.com offers viagra ordination http://www.daveywavey.tv/cialis-7547.html at cheap rates because, they invest a negligible amount of their profits in promotional activities, and instead they benefit the customers by offering them these products at lowest prices.This attempt of online pharmacy has made viagra accessible to the people belonging to economical class. viagra ordination has become daveywavey.tv with the lapse of the patent protection of its main ingredient Sildenafil Citrate expired. Colored sprinkles

Bake the brownies, per the package instructions. (Note: this works best with thicker, cake-like brownies, so I added an extra egg, and reduced the water, as suggested on the back of my brownie box. I also replaced the oil with applesauce, just to make them a bit more healthy.) Allow the brownies to cool completely (to save time, you can bake the brownies a day in advance).

Use a cookie cutter to cut out the shapes, and set them aside on a plate or piece of waxed paper.

Melt the white chocolate in the microwave, following the package instructions, until melted. Use a spoon to drizzle the melted white chocolate over the brownie shape. Then drizzle the caramel sauce over the white chocolate (you may need to microwave your caramel sauce for a few seconds first).

Let stand, until the white chocolate hardens, and then enjoy all of your hard(ish) work!

Follow Me on Pinterest

Sweet Potato Fries

Pin It

I’ve tried several recipes for sweet potato fries, all with varying degrees of success (or failure). This recipe from the Food Network is the best recipe yet! The fries are full of flavor, tender on the outside, and crisp on the outside. Click here to view the original recipe, or you can follow my slightly modified version below.

Sweet Potato Fries

Ingredients
2-3 medium sweet potatoes
3-4 tablespoons olive oil
1 ½ teaspoons brown sugar
1 ½ teaspoons salt
1/4 teaspoon ground cumin
1/4 teaspoon chili powder
It enhances the prix viagra pfizer blood circulation in the male organ. It viagra vs generic boosts blood flow to the reproductive organs. The getting viagra in canada more sensory involvement, the more brain power you have working for you. The deficiency of vitamins and minerals, or poor diet on line levitra also worsens the condition.
Preheat the oven to 425 degrees.

Thoroughly wash the sweet potatoes to remove any dirt from the skin. Cut the sweet potatoes into French fry shapes, about 1/2-inch wide by 3-inches long.

Add the sweet potatoes and the remaining ingredients to a large bowl and toss together until well coated. (Note: if you use more olive oil (4 tablespoons vs 3 tablespoons), the fries will have more of a “fried” texture.)

Spread the sweet potato fries out on a large baking sheet, making sure the fries aren’t crowded. I usually need to use more than one baking sheet.

Roast the fries 20-30 minutes, stirring once, until the fries are very dark around the edges. I’ve discovered that the sides of my oven are hotter than the middle, so some of my fries on the edges of the pan will be a bit burnt when the rest of the fries are perfectly done. Every oven is different though, so adjust your baking time, if needed. Enjoy!

Follow Me on Pinterest

Crispy Baked Chicken Strips

Pin It

I’m not much for kid food, but I love a good chicken strip (or chicken tender, chicken finger, etc). Something about the tender chicken surrounded by crunchy breading make them irresistible to me – and my kids.

This is my new favorite chicken strip recipe! Panko bread crumbs make them extra crispy, and they are baked, not fried, so they are healthy too – bonus! 

I served these with super-delish sweet potato fries and some dipping sauce.

Next time I make these, I’m going to double the recipe and freeze the extra chicken strips (after they’re cooked). You can reheat them in the toaster-oven (or regular oven) to maintain their crispiness. Try the chicken strips sliced over a green salad or pasta, or maybe a chicken parmesan sandwich (hmm, I’m going to work on that recipe).

Ingredients
1 cup flour
Salt
Pepper
2 eggs
1 ¼ cup panko bread crumbs
3/4 cup Italian seasoned bread crumbs
1 cup grated parmesan cheese
3-4 boneless, skinless chicken breasts

The entrepreneur CEO can generic levitra http://www.icks.org/html/03_conference.php?seq=27 easily be the most stressed and occupied professional in an organization. It deals with high grade lifting equipments to ensure good quality products for acheter viagra pfizer the clients. Most of tadalafil best buy the people buy motorbikes to satiate their thirst for an ultimate riding experience. These herbal pills are developed using only http://www.icks.org/data/ijks/1482460255_add_file_6.pdf sildenafil for sale organic and pure or tested herbs in right ration to cure impotence problem in men. Preheat the oven to 425 degrees. Line a baking sheet with foil and spray with olive oil or cooking spray.

Add the flour to a shallow dish, and season with salt and pepper. Set aside.

Add the eggs to a second shallow dish, and beat lightly with a fork. Set aside.

Add the panko bread crumbs, Italian bread crumbs, and parmesan cheese to a third shallow dish, and stir to combine. Set aside.

Cut the chicken breasts into strips, about 1 ½ inches wide, and 5 inches long. Season with salt and pepper.

Now, create your assembly line. Start with the chicken, then the flour, egg, bread crumbs, and lastly the prepared baking sheet.

Next you’ll bread the chicken, using the “wet-hand/dry-hand” technique (this will keep your hands goop-free and make the coating process faster). Drop a chicken strip into the flour with your left hand (wet-hand), and then use your right hand (dry-hand) to coat the chicken with flour. Shake off the excess flour and then drop the chicken into the eggs (don’t touch the eggs with your right hand). Use your left hand (wet) to coat the chicken with egg, and then drop the chicken into the bread crumbs. Use your right hand (dry) to coat the chicken with bread crumbs, and then place the chicken onto the baking sheet. Repeat for the remaining chicken strips.

Make sure that the chicken isn’t crowded on the baking sheet; otherwise the chicken won’t get crispy. You may need to use more than one baking sheet, and cook one baking sheet at a time.

Bake the chicken for 15-20 minutes, turning once, until the chicken is cooked through and the breading is golden brown.

Follow Me on Pinterest